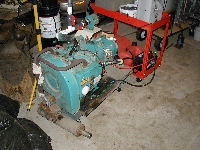
During the last half of 2009 I bought 2 used Onan RV-type gensets to use for experimenting with woodgas as a fuel source.
You can click the "My Woodgas Page" link, above to see what I am doing with woodgas at present.
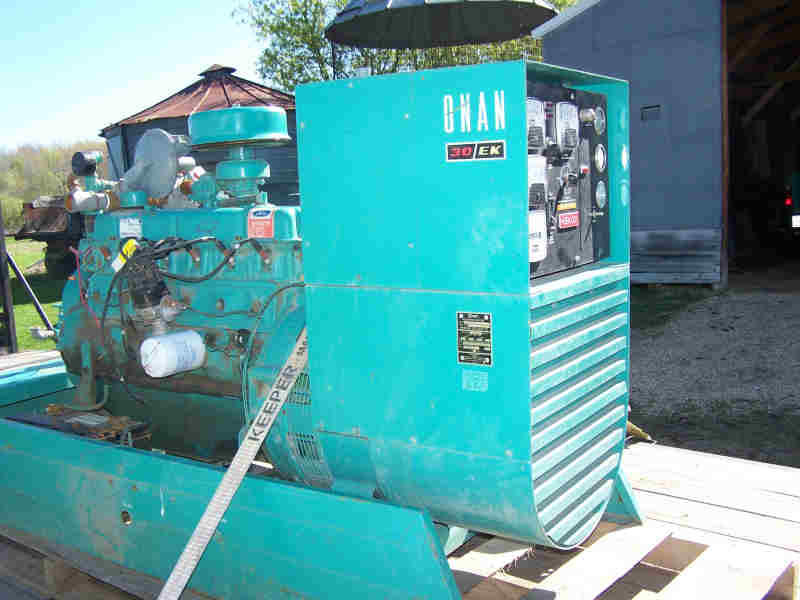
Then, in the spring of 2011, I bought an Onan 30EK genset at a local on-line auction.
Early on, I bought CD's containing manuals for MY gensets from a company that sells them on E-Bay. They have some value, but in neither case did their content fit exactly the genset for which I bought it. Serious googling and begging has filled almost all of the gaps.
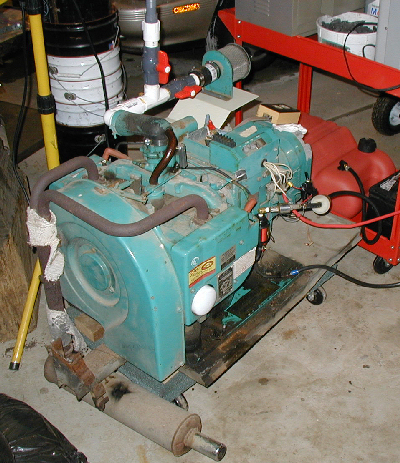
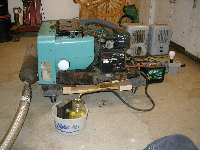
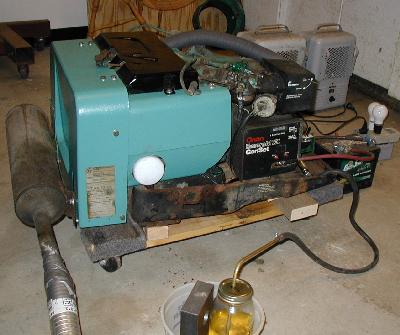
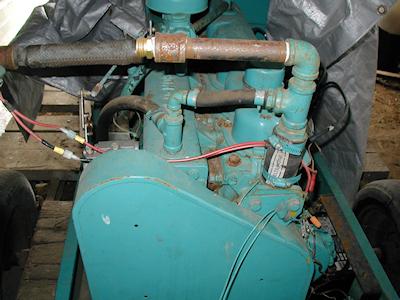
You can see that I have repositioned the air cleaner and added the white plastic woodgas supply "carburetor" to the existing system.
Update, April, 2014:
This is the genset that I use for all my woodgas testing to date (See link to "My Woodgas Page", above.)
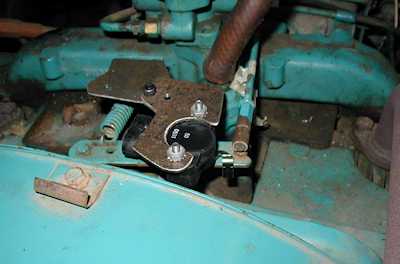
I have just added a throttle position sensor to the governor arm and it is connects to the home-made Arduino-based Datalogger that I use to monitor
the system when it is running on woodgas.
Here's a picture of the way I mounted the TPS:
Back to the story of getting it running:
The seller told me that this one was running when they removed it, but I really doubt it. There was a glob of rust in one
cylinder and the choke shaft had been broken off when something heavy had been dropped on the choke heater.
I removed both
heads, and cleaned out the rust, rehoning that area and freeing the valves.
I removed the broken off choke shaft, cleaned up the area where it broke, drilled and tapped the broken parts to 4-40, inserted
a piece of 4-40 threaded rod to assure alignment and brazed it back together. Works fine. I did buy a replacement choke heater
housing and bimetal spring on E-bay, but, since I am going to use this genset in a fully attended mode, I just put a manual
lever on the choke shaft--- for now, anyway.
I tried to start it. I thought I'd try to start it on
ether before starting to spend money on the machine. It fired right up on the ether, thank goodness!
As soon as I heard it run, I changed oil and filter. Later, after running it for an hour or two, I changed both oil and
filter again, just to make sure it was clean inside.
But when I plumbed in a quart jar as a fuel tank, I quickly discovered that the fuel pump was bad.
That's when I started learning how expensive parts are from Cummins/Onan and its dealers.
I ended up using a low pressure automotive fuel pump from the local parts guy. It cost about $50 and it works fine.
During this time, I was googling around for manuals and other information. I did find some helpful information. The first thing I learned was that it is real difficult to figure out what's actually inside the machine. Onan sure did make a lot of different versions of any given model.
The next issue was to get the genset to run long enough to see if I could make power. Even though the fuel pump worked,
the carburetor was clogged up enough that I had to run on almost full choke to keep the engine going, even with the main jet
several turns open.. But that was enough so I could see that it did, indeed, generate power.
I didn't look forward to tearing down the carburetor, so I poured several ounces of Sea-Foam into my one quart "glass tank",
filled it the rest of the way with gasoline and started it up. I ran that fuel through, again almost completely choking
the engine with my hand. There was no change. I loaded the jar up again with several ounces of Sea-Foam and some gasoline
and ran it again. About half way through that run, the engine just quit. The main jet had cleared itself and flooded the
engine. I screwed it down to only about 1 1/2 turns open and it now starts and runs well.
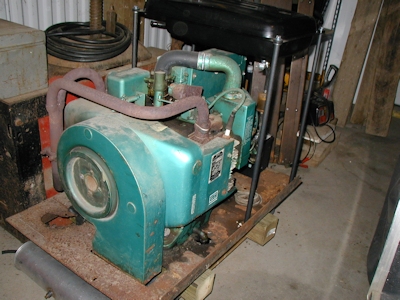
This one was extremely rusty and otherwise corroded.
The seller of this one said it had been given to him by a guy who took it out of his motorhome because it had quit generating. We cranked it over by hand and it did, at least, have good compression. But it must have lived most of its life in the rust belt, because the sheet metal was rusted very badly.
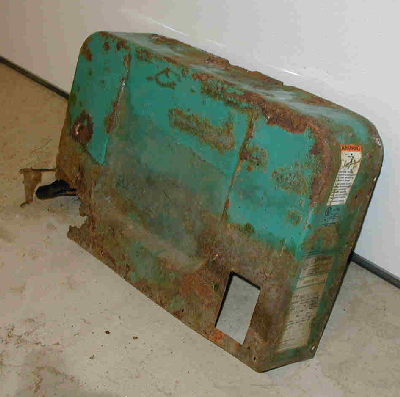
Not only that, but many of the bolts and screws holding parts onto the engine were corroded deeply. Corrosion had also
gotten into the generator's control box area, corroding some parts of the circuit board, the starting solenoid and other
parts.
The engine could not have been running at all because the rear starter bearing had broken allowing the armature to jump
around and smash some of the permanent magnets in the field area. The starter solenoid was shot and the fuel pump
was so rusted that you could hardly tell what it was supposed to be. I had to cut the original metal fuel line
off because it was so rusty. All the carburetor adjustment screws and shafts were stuck.
I had to buy a new starter, though. Ebay has at least 3 sellers of aftermarket starters and I paid about $60 for mine.
The next issue was replacing the fuel pump. I bought one that was recommended for this engine from flightsystems for about
$40.00. I had to drill out 3 screws to get the fuel pump and its bracket off. One of those screws was used to hold the
solenoid in place, so that made solenoid removal a little easier.
Once all those parts were in place, I tried to fire it up, but no cigar. Dead.
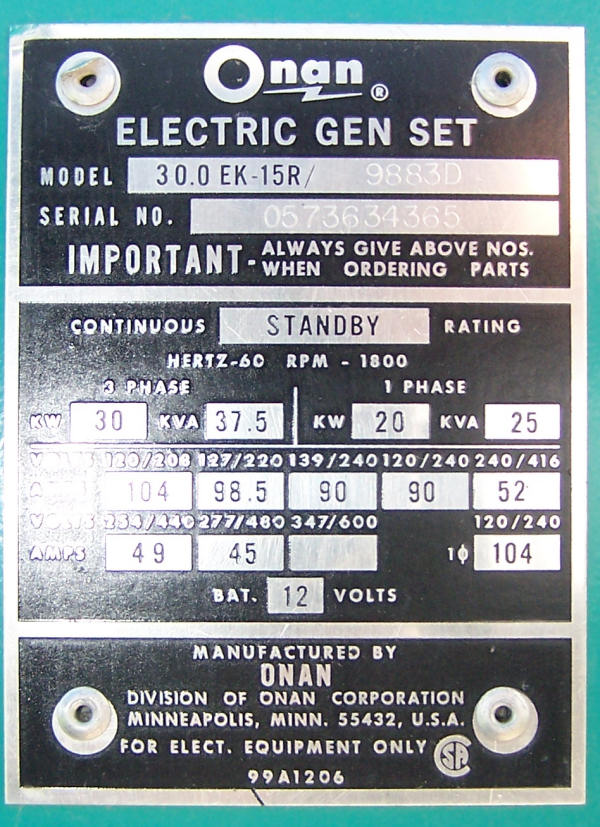
Now on to the control board. Well, first, I needed a schematic for the machine. What a problem! This machine is a
"Spec D" unit. This means that it is about the last NH unit to NOT have electronic regulator. It had a control board
with 3 plugs on it when it was manufactured back in 1988. But, in about 1993, someone replaced that control board with
a later model board that has only 2 jacks. This board was part of a "kit" which included a new wiring harness that changed
the actual wiring a lot. This really complicated troubleshooting. It took me a long time to even realize that the
foregoing modification had occurred! Click the "NH/BG Control Board Upgrade Info" link at the top of this page to see more.
Once I had a general idea about what was going on, I found that the Start-Stop switch on the control board was bad.
2 problems there: First, the board had been coated with a heavy varnish to minimize corrosion. This makes it hard to even
test probe, let alone unsolder and replace components on the board. Second, I couldn't find an exact replacement switch.
So, I replaced the Start-Stop switch with two small momentary push buttons that I mounted off-board, to the front plastic
panel, right beside the silk screened words "Start" and Stop".
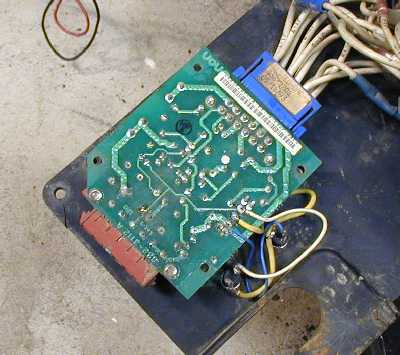
Still no cranking action! Back to the control board. By now I had determined that relay K2 had to pull in before
anything could happen. I found that corrosion had eaten into the board foils where one K2 coil contact came through.
I had to dig deeply into the substrate to find enough K2 coil lead to solder to and then added a short strand of wire to
reconnect it to the foil.
.
Success! The engine would finally crank! So I squirt in some ether and WOW!, it runs. But---
Now I have the old "Engine Starts Up, but Dies as soon as the start switch is released" problem.
Next thing I did was to replace oil and filter.
By this time, I had removed the carburetor, disassembled and cleaned it, reinstalled it while leaving off most of the
extra stuff, like the choke heater, vacuum pull-off, air cleaner assembly, etc.. So, I hooked an analog voltmeter to the
the choke heater leads (which ARE the B1-B2 generator terminals) so I could see if the machine was generating power to
run its own control circuits.
I could see no voltage at that point as I ran the engine on ether.
Next I assumed that there must be no field current, so I opened the generator brush cover to check out the slip rings.
On this unit, the rotor is the field and all the outputs are taken from the stator, so the rotor has only 2 slip rings.
I found that the stranded leads to the brushes were almost corroded through, but they were still making contact, so I removed
them so I could look at the slip rings. The slip rings were so corroded they looked all white! I cleaned them up fairly
well with fine abrasive paper, enough that they were shiny in most places. I measured the rotor resistance and it was
okay at about 21 ohms. Reinstalled the brushes after lightly sanding them with a correctly sized dowel and sandpaper.
Ether again, engine starts up, but still quits when you let up on the start switch. This time, however, I see a little
wiggle on the meter connected to B1-B2 (at the choke heater). Upon looking at the voltage regulator (VR1)connector, I found
one connection that was badly scorched, so I wired around it. No change.
After doing a lot of research, finally finding the really
great Onan Forum at Smokstak.com, and after trying a lot of things, none of which worked, I finally decided to go back
to the slip rings again. I had already connected a dc ammeter in series with the field leads and hadn't seen any appreciable
current flow. So now, I connected an ohmmeter across the brushes (field leads disconnected, of course). I found that
I still had the 21 ohms across the field, as long as the generator was at rest. BUT if I turned the engine over, the
resistance became erratic and high. Aha! I removed the brushes again, made a special little paddle to which I could
attach my sandpaper. I applied the paddle to the slip rings with the engine running on ether, several squirts worth.
This gave me totally shiny and much smoother slip rings. Upon reinstalling the brushes, one brush holder came apart due
to corrosion on one tiny (tinier than I have ever seen) pop rivet. I fixed that with a 2-56 screw and nut.
I have since installed brand new brushes.
Try again, with ether, it CONTINUES TO RUN after letting up on the start switch!
Now I get about 14 volts ac at the choke heater leads. Of course, this means that the machine is creating DC to run the
control circuits after the start switch is released. It also means that the whole control board is working correctly and
so is the VR1 voltage regulator.
I still haven't looked for 120 volt output. This model is supposed to be a 120 volt ac only model. It has 2 separate 120
volt outputs via 20 amp or 30 amp circuit breakers. When I first connected one output to a light bulb, I got nothing. I
had bad thoughts at that point, but it turned out that the problem was the circuit breaker itself. The other one was good,
and I finally had a functioning genset!
I replaced the bad circuit breaker, another job for "corroded bolt man".
*** A side note about the circuit breakers: I don't know why Onan would have installed two 20 amp breakers in a genset
that is rated for 6.5KW, because you can't get that much power through those two breakers. But, they do show both 20 amp
and 30 amp breakers in the parts manual. Also, they tell you in the installation manual, that, if you need the extra power,
install 30 amp breakers.
At this point, the machine was running and generating power, but it would begin to stumble and hunt a minute or so after
startup. I first thought it was a clogged main jet, but that didn't make sense since it started up just fine. I gave it
a couple of treatments of Sea-Foam as I had done with the 6.4NH3CR, but no help.
Finally, I just started twisting the idle jet open, and, after opening it about 2 full turns, the engine smoothed right out!
Who'da thunk it?
Now its time to clean up the sheet metal. The "Scroll" (main cooling shroud) was rusted so bad that parts of it were gone
so I made a new section as needed and pop riveted it in place. I sanded and sanded and
Electrolytically Derusted
the major sheet metal parts. A lot of metal had just gone away, so the result isn't the greatest.
But I had many many stuck and broken of bolts and screws to deal with there, too.
By the time I had gotten into it this deep, I even put up my own webpage about
Removing Stuck Bolts.
I read a post on Smokstak where a guy bought "Lincoln Green" Kilz-based paint at Walmart to repaint his Onan so, as I didn't want
to wait for an expensive Onan Green spray bomb, I bought a quart. It is exterior house paint, not high temp engine paint.
We will see how it works. I found that it wouldn't stick to the parts, so the after scraping and sanding of my first attempt,
I spray bombed the parts with a green enamel first. That seems to work well as a primer for the "Lincoln Green" house paint.
For the "Noise Cover", I used a black spray bomb primer, then semi gloss black enamel. It's a so-so job, but I'm in it for
function, not fancy.
Originally, as I said, I was going to set both of these up for woodgas operation. But now I think I will simply use this
genset as gasline powered backup machine.
So, I decided to put it completely back together, as opposed to leaving some of the automatic stuff. I was able to clean
up the vacuum choke pull-off assembly and it works, surprise, surprise. The choke heater mechanism was stuck, but the
heater element was okay and it is now working. This model has a "Winter/Summer" valve built into the air filter. It moves
a vane that allows hot air coming over the exhaust manifold to enter the air cleaner. One end
of the operating lever was even rusted off! I brazed it back together so even that feature is operational.
This one is a "city water" cooled model. That means no radiator. It also has a water cooled exhaust manifold. Hooked up properly, I should be able to do a lot of house heating with the cooling water when I am running it.
I paid $600 for it.
Only 243 hours on it. Runs like a top on propane. But, it had a cracked block. So far I have successfully sealed it with some expensive stuff
recommended to me by a trusted mechanic. This sealer was applied inside the block (by running the engine with the stuff in the cooling system)
after extreme flushing of the system.
Since the unit had no radiator, I had to make up a temporary water-to-water heat exchanger. That was an interesting brain-
teaser.
Next task was to seal it from the outside, too, using JB Weld, which comes also highly recommended.
I figure that, even if the block caused a problem, I could replace it with a rebuilt long block for $1300, so I'd stiil
be 'way ahead of the game.
I recorded the process of flushing, sealing the inside and sealing the outside of the block on three Youtube videos.
Here they are:
Part 1, Flushing the cooling system
Part 2, Sealing the block from the inside with K and W Block Seal
Part 3, Sealing the outside of the block with JB Weld
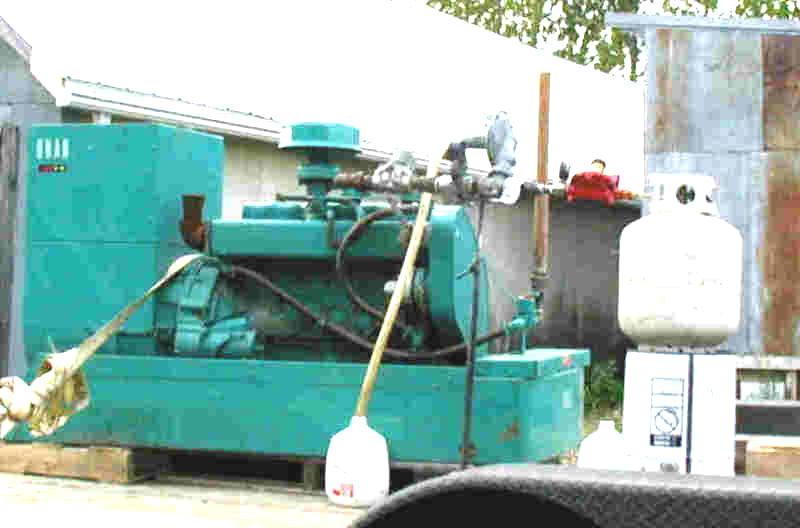
The propane hookup was new to me.
Currently I am running the genset from a small tank just for testing.
Here is a picture of the setup I am using:
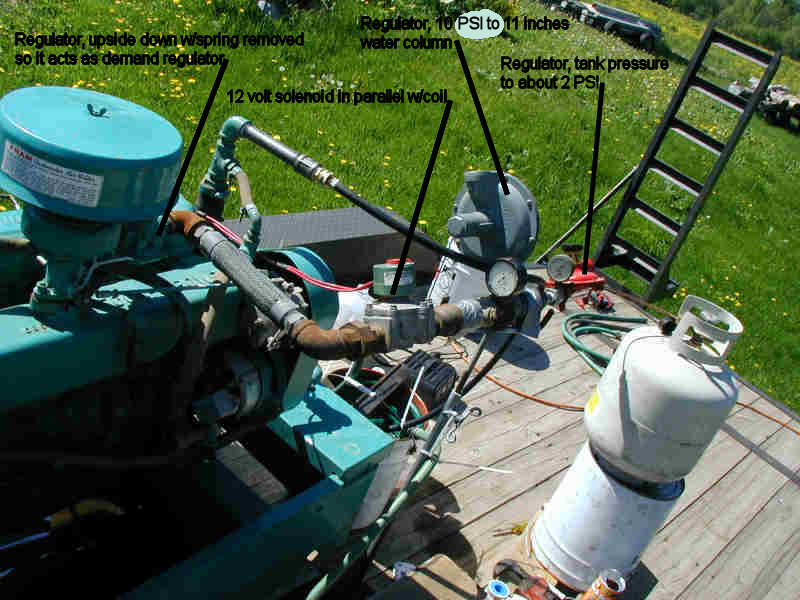
You can see two gages in this setup. The one on the "red" regulator tells me that I am not over pressurizing the next
regulator in the line, the large gray one. It can only take about 12 psi.
The second gage, the one with the black shell, measures the pressure in inches, water column. This one is important to me
since it tells me if I am supplying enough pressure to the demand regulator.
At present, that gage sits at about 11 inches water column when the engine is running.
Initially, I had a problem with the engine not responding properly and I saw that the pressure at this point was dropping
to only one or two inches wc when I hit the throttle or added a load, so I knew that the problem had to be "upstream".
I found that the high pressure regulator,
the red one, was not delivering its full 2 psi, and I couldn't get it adjusted any higher , so I replaced it and all is
well.
I need to convert this machine to radiator cooling, but I am not sure how the water flow will be if I simply hook a radiator
up to the top and bottom large diameter outputs from the block.
See the two pix below:
Despite the fact that this genset has a rope start pulley on the flywheel end, it does, indeed, have electric start.
I bought this one at a local online auction house for $150. It needed a little clean up, a good shot of SeaFoam and a muffler.
I have the new muffler, but haven't installed it yet. It has the Sisson choke mechanism, but it does not work. I won't even
repair it, since it's no problem to pull on the choke rod to start it up.
You can see the gas tank that I mounted above the generator. It's a 4 1/2 gallon tank that I got from Surplus Center.
It has a fuel shutoff valve in a very handy place.
The genset runs very smoothly.
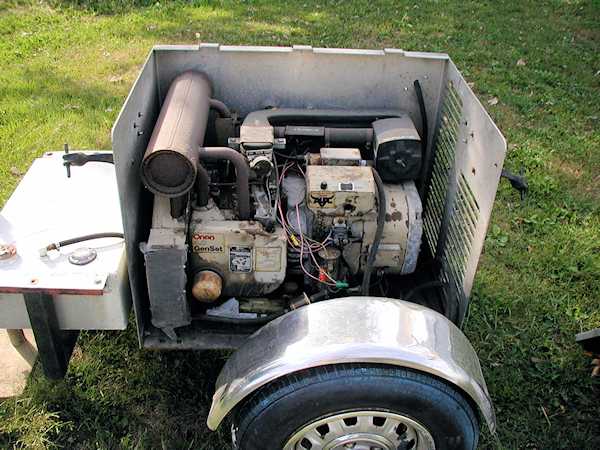
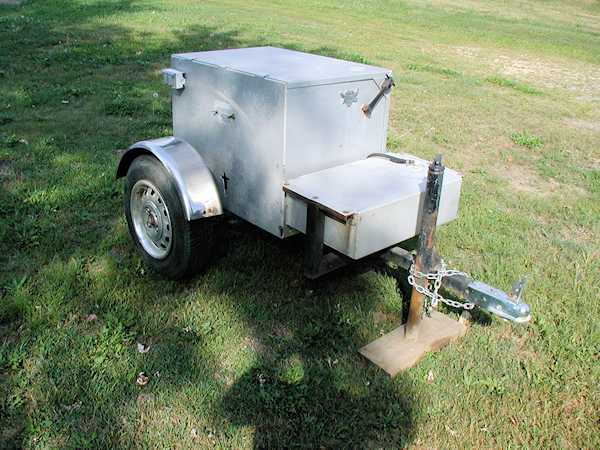
I got this on from an online auction house that's about 10 miles from our house. The genset is housed in this neat little
trailer.
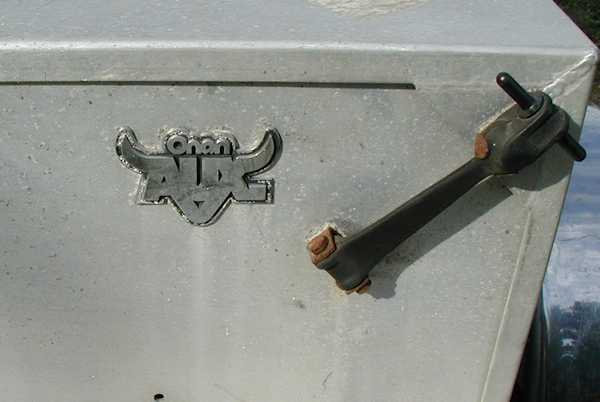
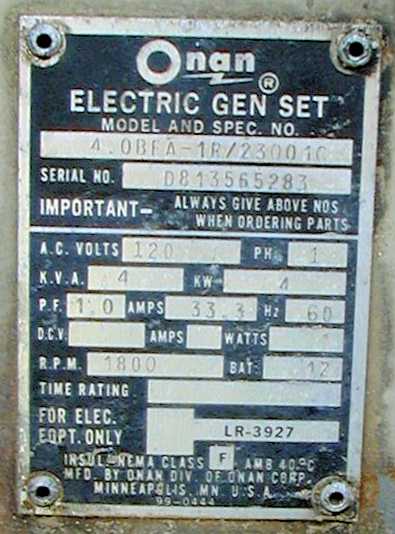
I don't know what I was thinking, but this genset is really a 4.0BFA, April, 1981. Someone has converted it to
"real simple".
It was sold as "not running". I poured some Sea Foam and gas into the tank, stuck a battery on it, and the fuel pump
even worked! Wouldn't start till I cleaned the points. I had one plug out to check for spark. After sanding the points,
checked again and the engine started and ran on the other cylinder! Runs smooth.
Makes voltage. One problem, though. It's making 168 volts at about 80 Hz. The governor seems to be stuck. It will move
to a higher speed, but not to a lower speed. I can't push the governor arm away from the carb to slow the engine down.
A quick post to the Smokstak Onan Forum got me the answer: someone screwed in the idle adjustment screw to speed the engine
up so it wouldn't surge. With my Kilawat connected and reading frequency, I slowed it down to 62 Hz and 131 volts,(no load).
The governor began to work properly, but, once the engine warmed up, it began to hunt. I may try letting it run for a while
with a lot of Sea Foam in the tank to see what happens, but I probably will eventually have to clean (boil out) the carb.
I used a jumper battery to start it up by clamping on to the heavy ground strap and to the input side of the
non-standard solenoid. I haven't been able to find any way that they'd have hooked a battery up for starting, unless they
did it like I did. There is no place for a battery, even a garden tractor battery, within the enclosure.
I have since found that this unit (the box, not the trailer part) was originally designed to be mounted someplace on an
over-the-road semi tractor. And I found a couple of feed-throughs in a corner that probably fed battery power from the
tractor to the engine.
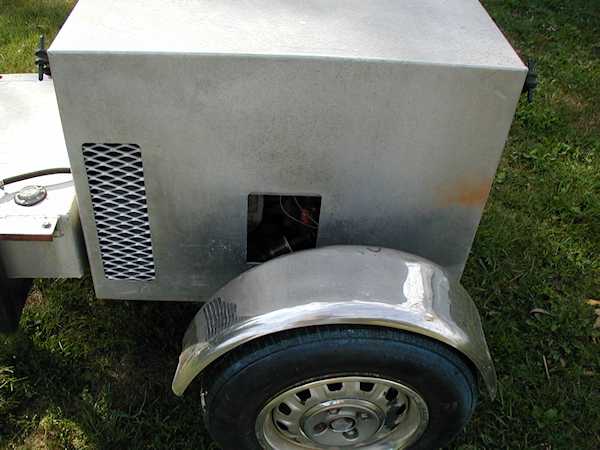
The only thing I can think of is that they had something connected through this opening in the left side of the enclosure.