Cub Cadet 127, Shroud, Blade for 42" Mower Deck
Fabricating a Replacement
Last Revised: October 21, 2023
Back to MY Cub Page
Home
Contact Us
Discussion:
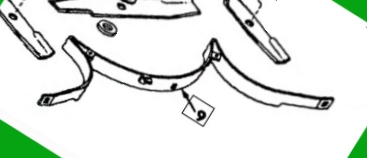
This part is the mower deck component that directs the flow of grass toward the exit chute at the right hand side of the mower deck.
So, I call it the "Grass Director".
I have several of this era (Narrow Frame) Cub Cadet garden tractor and this part, technically called the "Shroud,Blade" is the first thing to
rust away and become ineffective at its task. Maybe it's because I don't clean the deck well enough after every mowing, maybe not.
Anyway, I think I bought a few of them about 20 years ago, 2 for 42" decks and one for a 38" deck. I installed one of the 42" parts
and gave the other away. I still have the 38" part on the shelf. I paid about $40.00 each for them at the time.
Recently I needed more for 42" decks so I made 4 of them. They have all been installed by now and I need more.
So I am making 6 more and I thought I'd document the process that I used.
I think I came up with a cool way to bend the strips to the proper shape and it is covered here.
I made a youtube video of that bending process to accompany this webpage. Here's the link: Youtube Video on Bending the Strips for the Grass Director to Shape
By the way, as of October, 2016, I found a parts place that still sells them, but they cost $101.00 each.
Material:
1 ea. Strip: 48 3/4" of 14 ga mild steel, 1 1/4" wide. I went to a local fabricator's shop and they simply sheared the stock
from a piece of 14 gauge steel sheet.
4 ea. Tab: 1 1/2" long X 1/2" wide X 3/16" thick mild steel.
Fabrication Notes:
This component consists of two parts; the formed metal strip which directs the cut grass out from under the mower deck and the (usually)
4 tabs which serve to secure the metal strip to the underside of the deck. The tabs are normally welded to the metal strip but I offer
a method of attaching them with bolts if welding can't be done.
I have some narrow frame Cub Cadets with cast iron decks and some with stamped decks. And various ages of each. The part you make here will fit any of them
that I have seen so far, but the exact method of mounting them and locating the mounting tabs varies from one style of deck to another.
Some use 4 tabs, some use only 2. One model uses an attachment bolt at the mid point of the back of the deck, but others do not.
Some have all the tabs welded to the inside of the curve, some to the outside. Don't ask me why.
After the metal strip has been fabricated, I suggest you bolt it in place with only the end bolts or with the end bolts
(and center bolt, if used) BEFORE welding the tabs on. That way, you can adjust (bend) the metal strip to fit the location of the
tabs on your specific deck exactly. That's why I don't give location dimensions for the tabs.
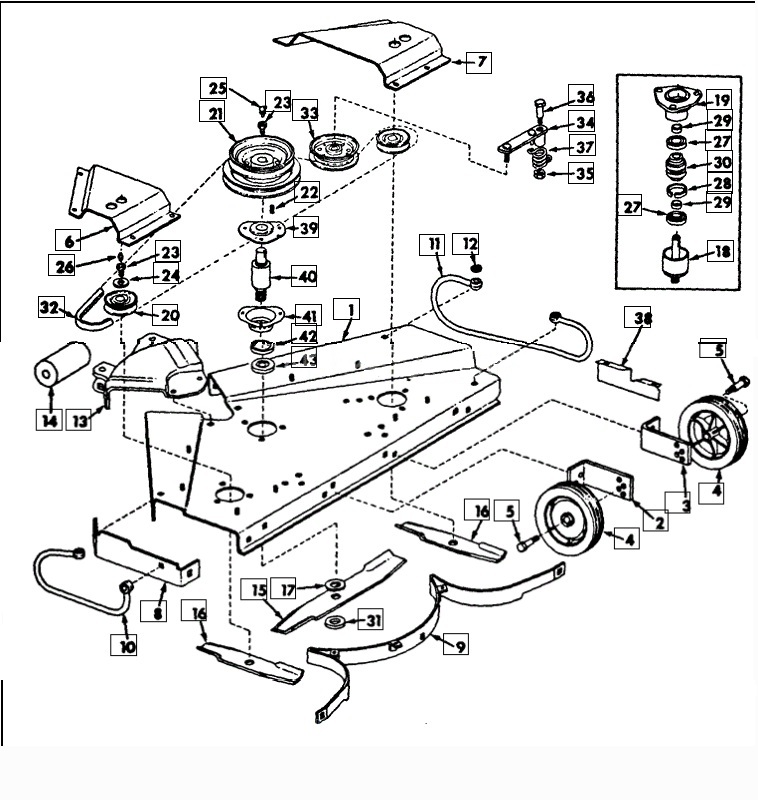
The "Guide, Blade" is #9 in the drawing above.
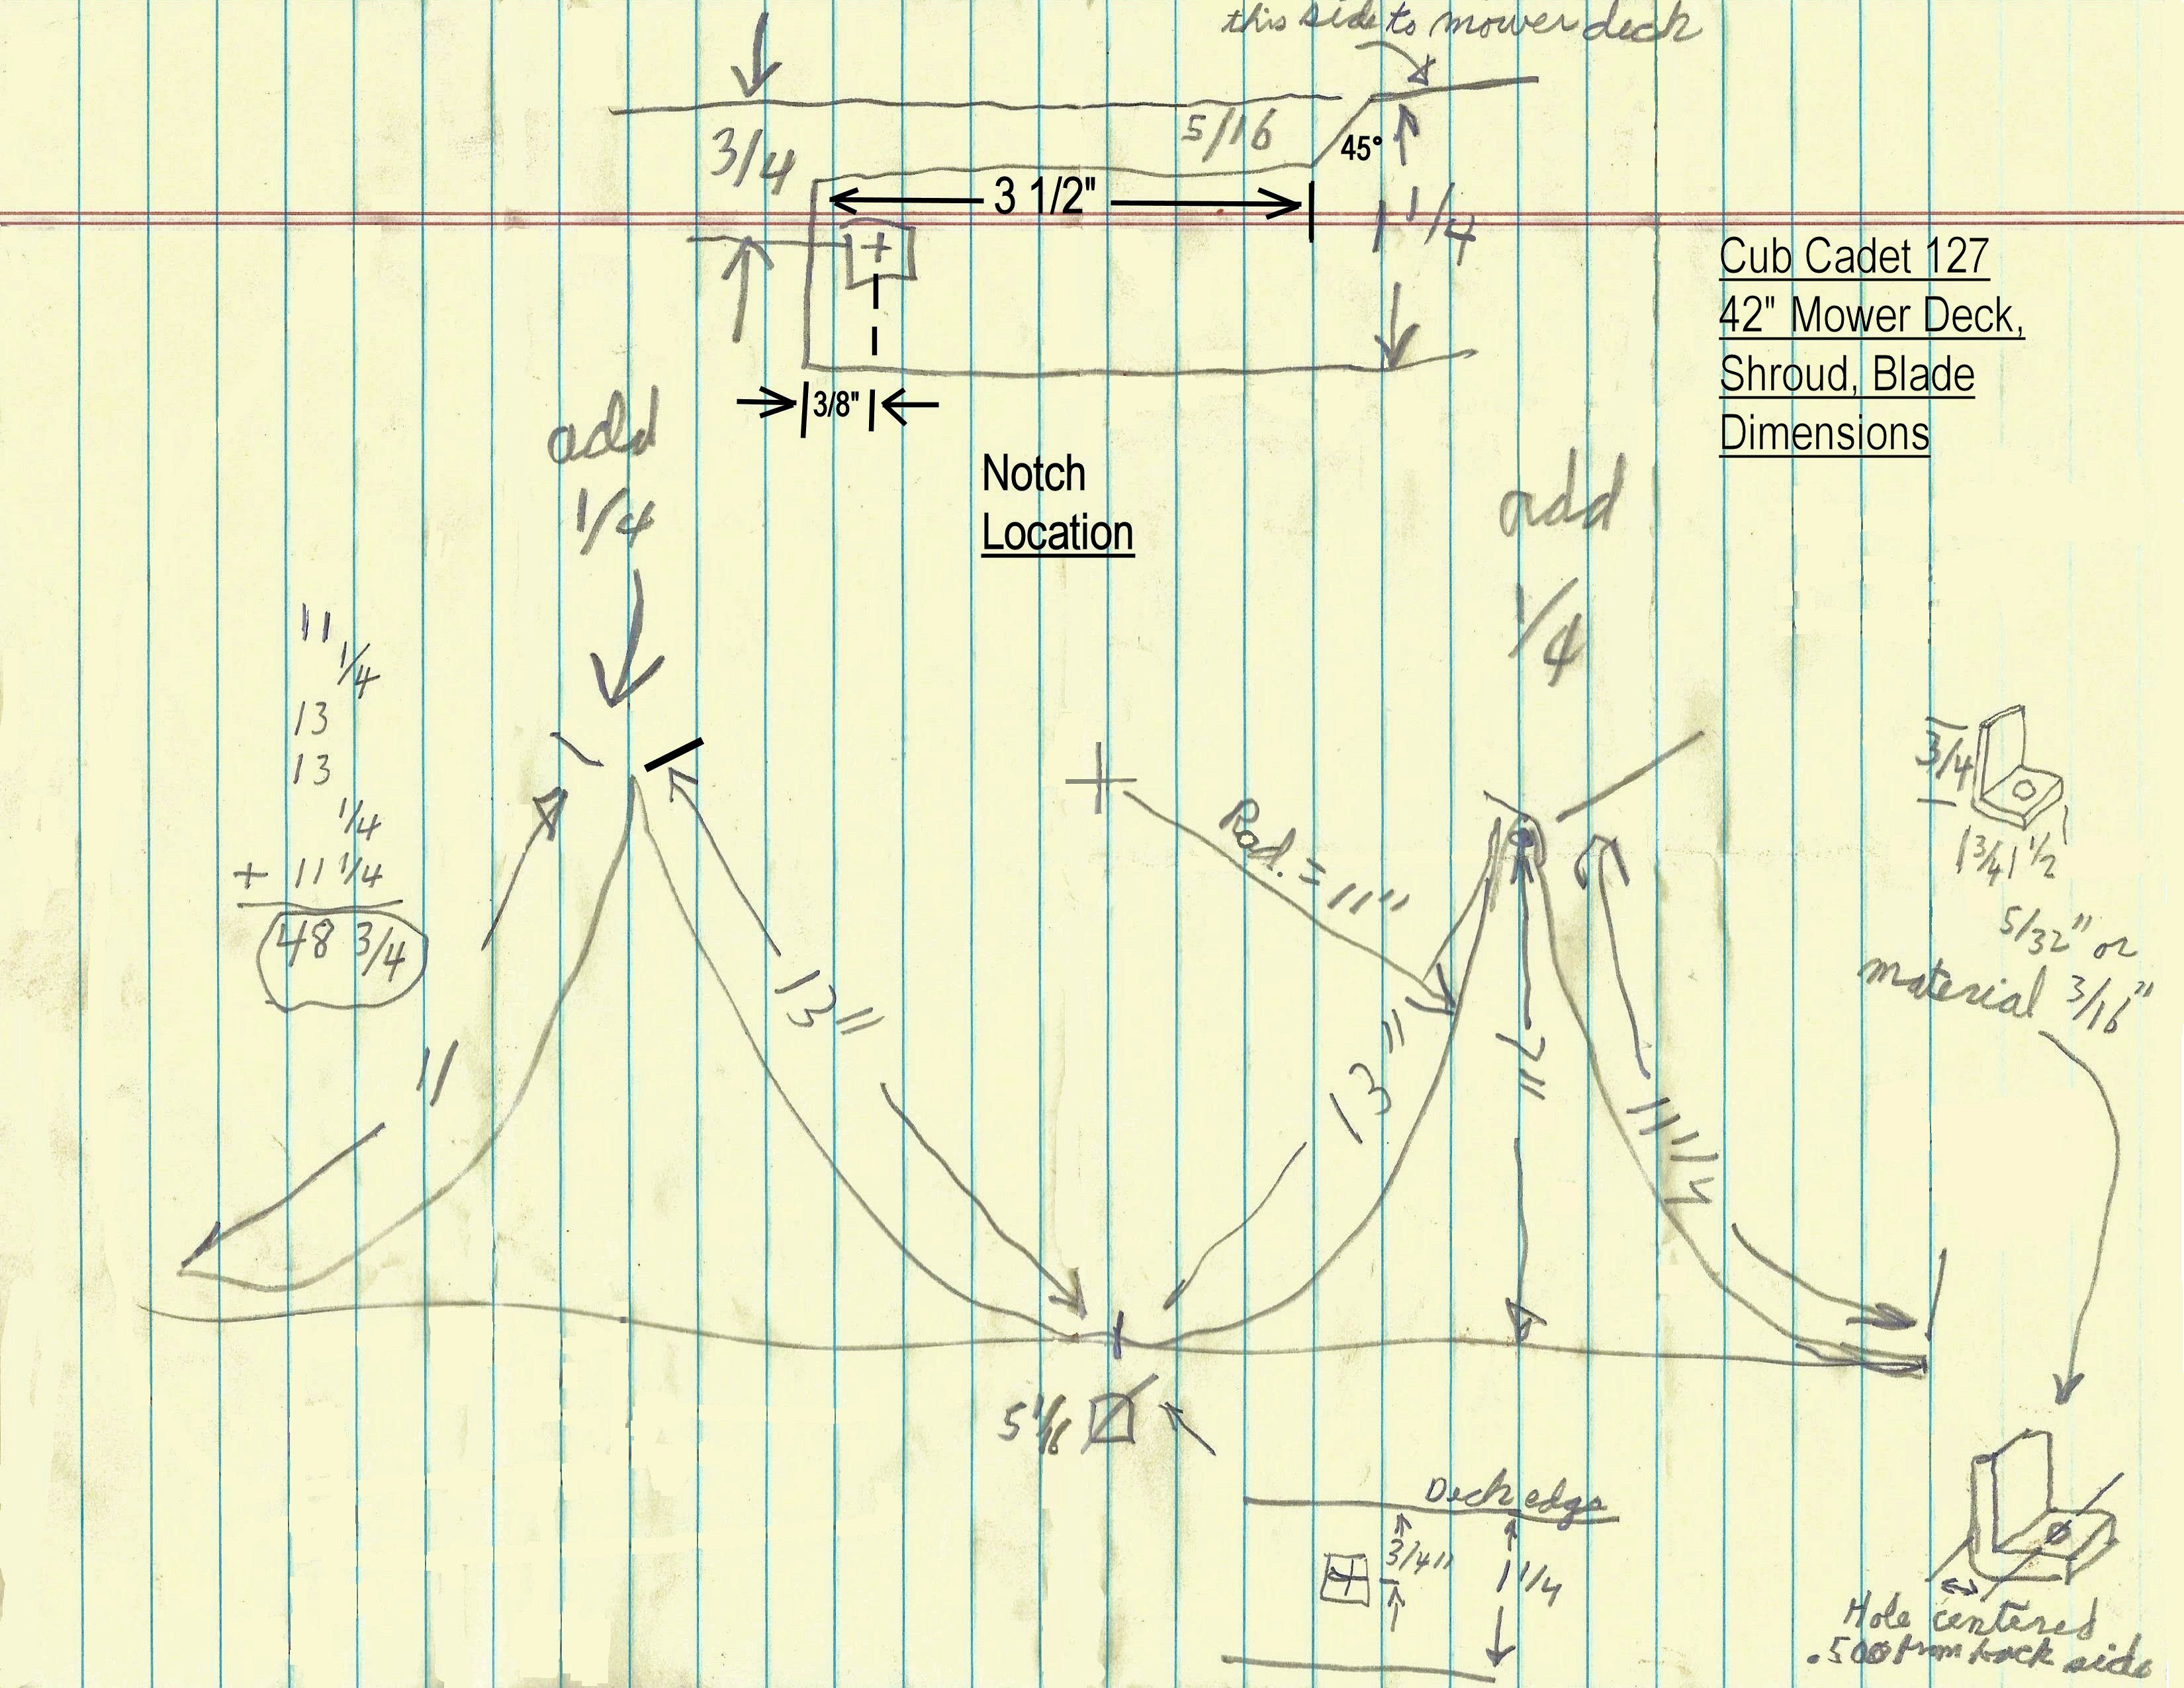
My (obviously) hand made drawing of the key dimensions for this project.
Fabrication:
The Strips:
1. Deburr the 48 3/4" strip. If you had it sheared, it may have razor sharp edges!!!
2. Center punch for a hole 3/4" from one edge at 24 3/8" from one end.
Note: If your deck uses this center hole, do NOT drill it until you have bent the strip to its rough shape.
3. Center punch holes, 3/8" back from each end, 3/4" from same edge used in step 2.
4. Saw off 3 1/2" X 5/16" notches at ends per "Notch Location" sketch. **Make sure to saw from correct edge.
The notch is needed so the end of the shroud clears the radius of the deck when it is bolted in place.
5. Drill the (2) 5/16" diameter holes and then file them to be 5/16" square so the carriage bolts will fit through them.
Note the orientation of the square opening where the carriage bolts go through the deck and maintain that orientation while squaring the holes in the strip.
6.Measure and mark (for bending)13 inches each way from the middle punch mark.
7.Locate about a 20" diameter buck ( something that has an approximately 20 inch diameter) and bend the center section between the 13" marks to produce an 11" radius.
This isn't a very critical task since you will be making slight adjustments to the bends as you fit the part into your specific mower deck.
8. Using a 3/16" piece of stock as a pivot, back bend the ends beyond the 13" marks to about 160 degrees.
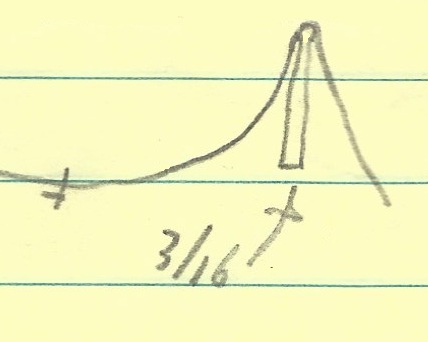
First back bend.

Note that both of the ends are still straight and still need to be curved.
9. Locate a 9" or 10" buck and bend the ends to approximate final shape.

Approximate final shape.
Note: Alternate way to prepare the strip
This method is what is covered in the video: Youtube Video on Bending Grass Director
Alternate (My "COOL WAY")method for bending (Steps 6 through 9) the Grass Director strip:
7A. Bend the whole part into a rough circle with an 11 inch radius AFTER making the 13" marks. Then do Step 8.
This will automatically produce the final rough shape without needing bending bucks.
I used my slip roll for this process, but you can do it by simply supporting the strip by two points that are about 2
inches apart and hitting the strip in between the supports with a hammer. Just hit hard enough to slightly deform the
strip, move it an inch or so and hit it again.
You don't want to make the final radius in one pass. Just go "round and round" hitting the spots you missed that last time
until you have the desired radius. This is not rocket science, so a high degree of accuracy is not crucial.
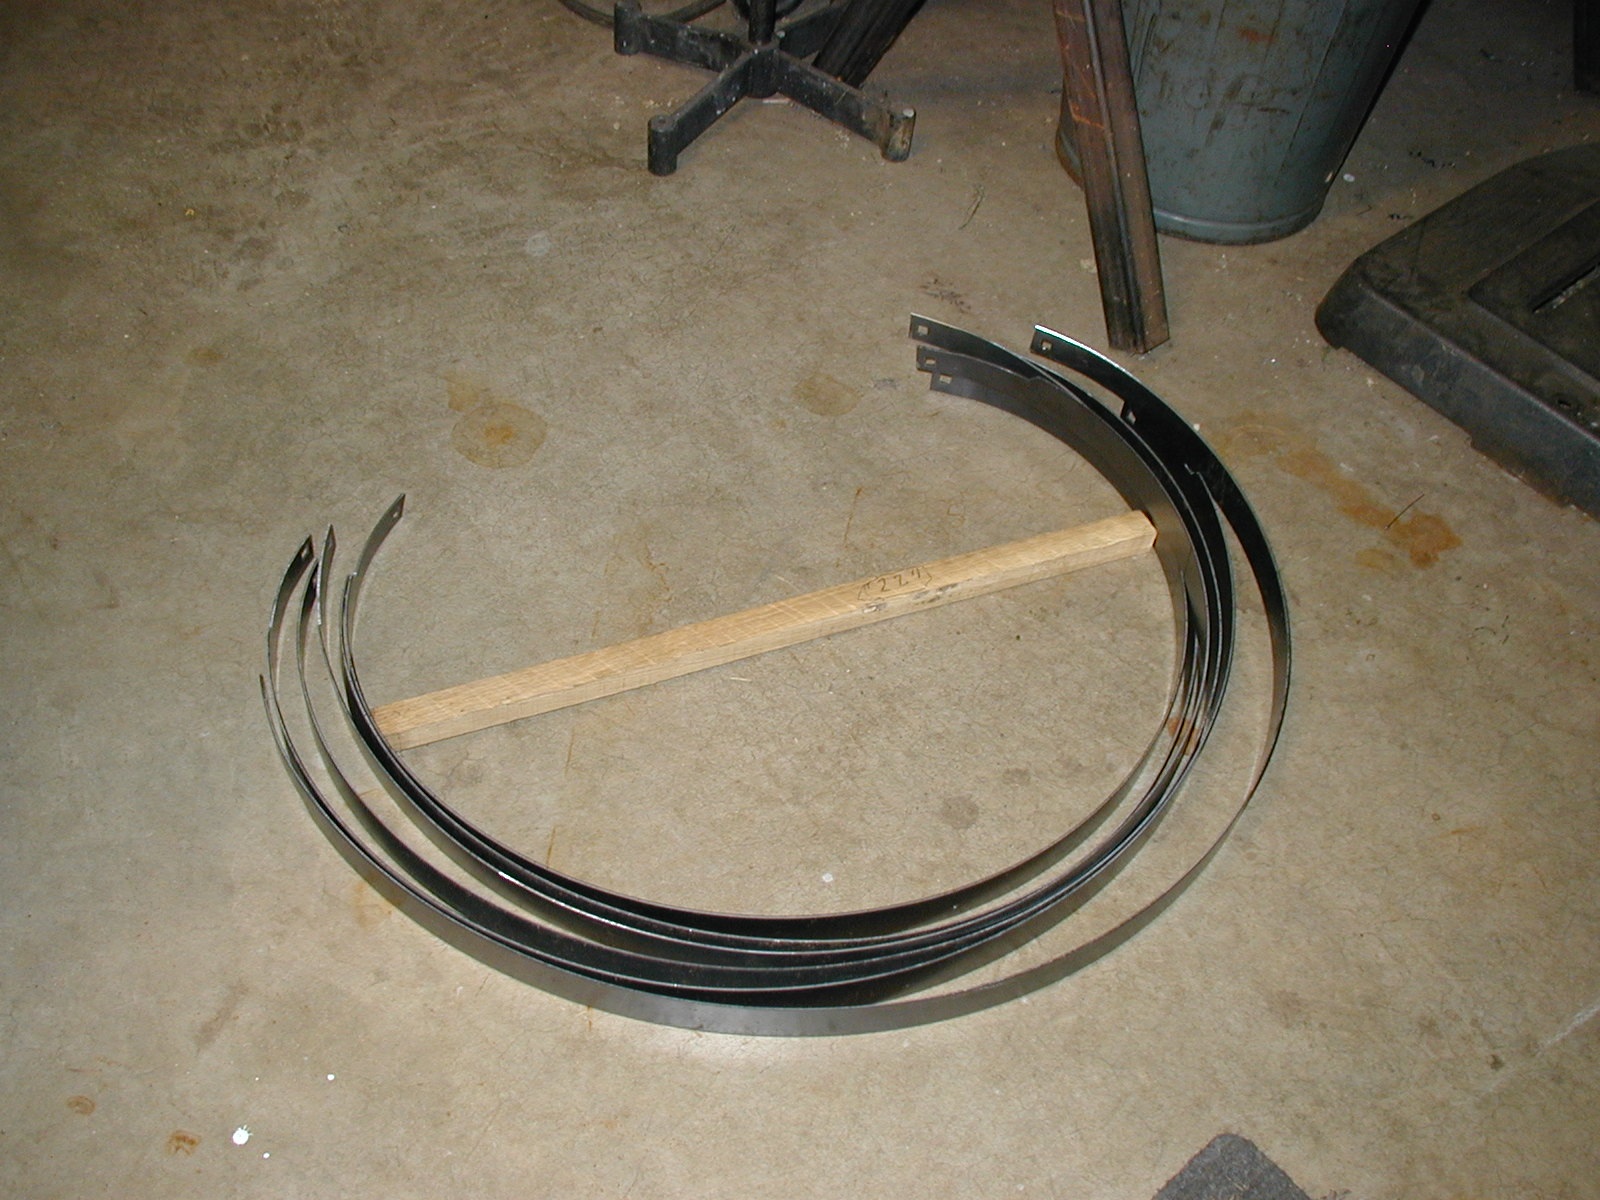
Here are 6 of the strips bent using the slip roll. You can see that the actual diameter isn't very critical.
10. If the center hole in the strip is used on your specific deck, now is the time to drill it out to 5/16" and file it square.
The Tabs:
1. Bend a 1 1/2" X 1/2" by 3/16" thick tab to 90 degrees in the middle.
2. Clamp the tab in a vise with and mark a hole position 1/2" from the back side of the bent tab, centered on the 1/2 width.
3. Drill #7 and tap 1/4-20.
4. Make four tabs.
Installation (Adjusting strip, locating tabs, attaching tabs to strip):
1. This section assumes that you have already removed the old Grass Director.
The bolts that you removed are probably in bad shape, so I suggest you get new ones.
For the 1/4-20 bolts, you might as well spend the extra few cents and get grade 5 or grade 8 bolts. They are about 1/2 inch long.
For the short 5/16-18 carriage bolts: The ones you buy in the hardware store usually have a squared section of shank that is a bit
too long, so it won't tighten up. If this is the case, you can add a slightly oversized washer to make up the difference.
2. For this step, make sure that the mower blades are in place to help you visualize exactly where the Grass Director needs to be located.
Lay the new Grass Director into the deck in its approximate position. At this point you can loosely bolt the ends in place.
If a center carriage bolt is used, you will need one or two washers between the Grass Director and the mower deck to hold the Grass Director
away from the radius of the bend in the deck.
You can loosely bolt the tabs in place, too.
3. Now start adjusting the exact fit of the Grass director.
You do this by bending parts of the piece so they lay in the correct position AND so they will contact the four tabs.
You may want to clamp the tabs, one at a time as you make these changes.
4. In my case, once I got everything lined up properly, I welded each tab to the Grass Director. And that's it.
4A. If you can't or don't weld, you can drill and tap the other leg of the tabs before installing them.
Then, once you have the alignment of the strip completed, you can mark and drill matching holes in the strip, then BOLT the strip to
the tabs with some more 1/4-20 bolts.