
The miner's lamp was apparently used by hard rock miners in the days before gas and electric lanterns. It is basically a candle holder, but has a few neat features. From what I have read, the miner would be issued 6 candles every day at the beginning of his shift. These candles and this Miner's lamp would be the only source for illumination all day long. The spike at the end can be wedged into a rock crevice. The design is such that it will sit on a flat surface, like a table or on the floor. The hook would allow it to be hung from an appropriate overhead hanger. The loop at the other end would be used to pull the lamp out of the crevice and also serves to steady the thing when it is sitting on a flat surface. I had heard rumors that the pointed end could also be driven into a supporting timber in the mine, but I have been told that this is a no-no. Smaller, shorter versions could be stuck in one's hat.
I found a Miner's Lamp of this style stuck in a post in the Minnesota State Fair blacksmith shop. Tom Latane' had made it.
Here's how to make the Miner's Lamp in the picture above:
Stock: 1/4" X 3/4" X 10" long mild steel
1. Slit the stock down the middle, for 4 1/2" from one end. A slitting chisel is the traditional way to do it,
but a hacksaw makes clean up a little quicker.
2. Shoulder in about halfway through, 1/2" in from the inside of the slit and then 2" from the unslit end.
3.Work the area between the shoulders down to about 1/4" round. This should produce about 5" of length of this 1/4" round area.
This area will become the handle.
4. Fuller the 2" end both ways to make it about 1 1/2" wide and about 3 1/2" long. This area will become the candle cup.
5. Heat at the base of the slit and bend the arm on the shouldered side up at 90 degrees.
This will become the hook for hanging the lamp.
5A. Straighten the "hook" arm. Look carefully for cold shuts or lumps in the bent areas and carefully file them out
before proceeding.
6. Draw out the hook to about 6" in total, including a point on the end.
6A. Roll a small scroll on the end of the hook, then form a shepard's crook of about 1" diameter.
Note: You can turn the hook either way. I think the "proper" way would be so the hook goes to the left as the
pointed end of the finished holder faces away from you and the candle cup is to your right.
7. Draw out the (so far) untouched arm made by the slitting operation to about 1/4" square and taper the end to a
point for about 1 1/2". Add a decorative twist in the center of this squared section.
8. Roll up the candle cup end to a tube about 7/8" inside diameter, or to fit the candles you would use.
9. Roll up the 1/4" round section to form a pleasing ring so that the candle cup sits right beside the hook.
10. That's it. Finish as you desire. I wire brush, warm it up to about 350 degrees F, apply beeswax and wipe it
off with a cloth.
It was very interesting to me to have to figure the stock size and process out on my own. The first one took about 2 hours to make.
Here's a demo board that I just made. Maybe it will help some folks to visualize the steps:
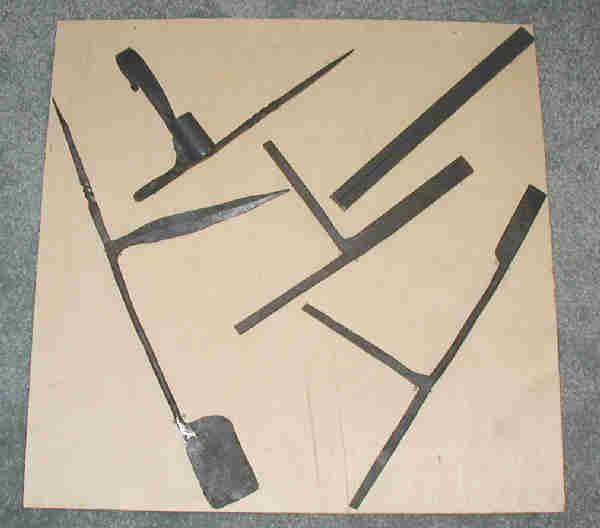
As I look at the board, I can see that I am now making the Miners Lamp using a somewhat different process than I used
in the original article. Obviously, either way will work, but I like this way better.