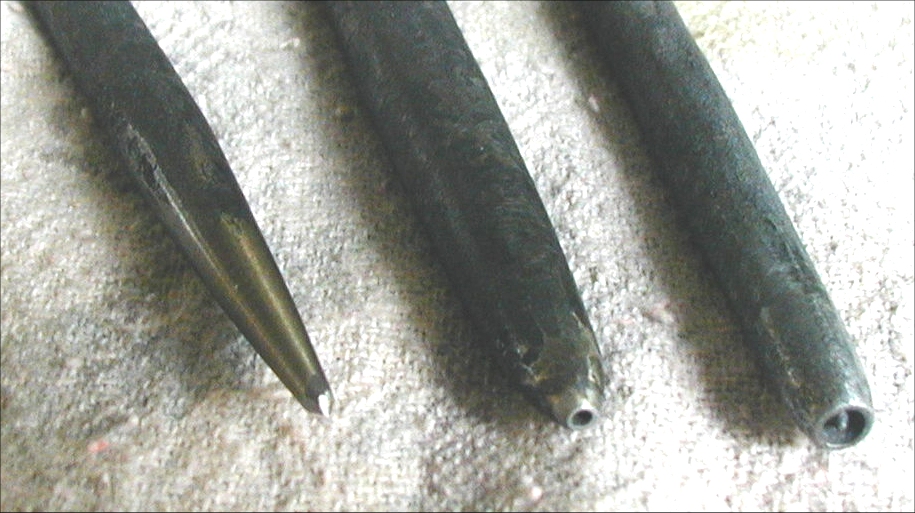
Figure 1, Eye Punch-Making Sequence
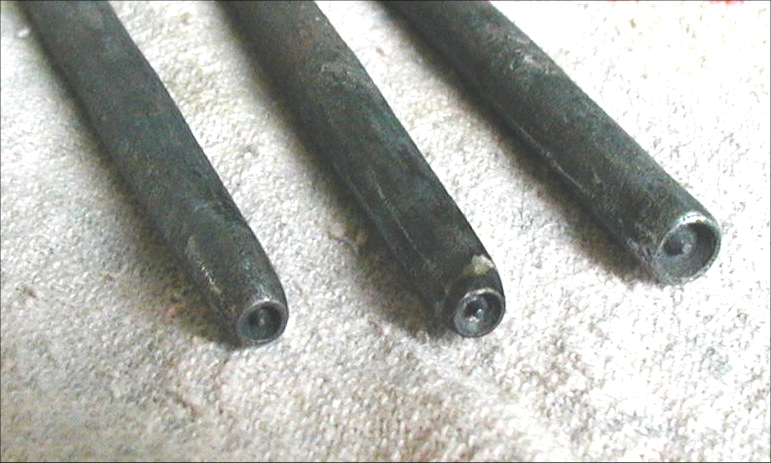
Figure 2, Finished Eye Punches, 3 Sizes
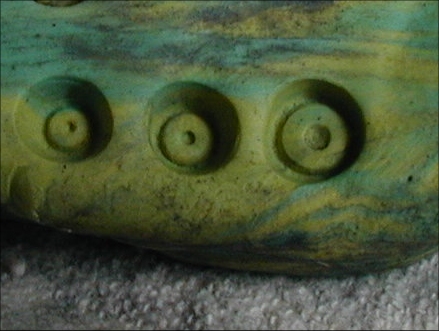
Figure 3, Eye Punch Impressions, Deeply, in Clay
These punches really add a touch of realism to your animal heads and eliminate the problem of messing up the whole eye if you try to punch a pupil with a separate tool after the eye has been set into the head.
This is an intermediate level project.Study the three figures and this text carefully before starting this project to see how the two intermediate tools (the center punch and the pupil punch) relate to the end product (the EYE PUNCH). Then decide what size eye punch(es) you want to make. You may need to make two or three of them to fit various size animal heads. Figure 1 shows the two intermediate tools and then the completed eye punch. Figure 2 shows three completed eye punches of different sizes which are: (L-R,) 3/16", 7/32" and 9/32". Figure 3 shows their impressions in clay.
Materials to make ONE Eye punch
-three pieces of 5/16" to 1/2" diameter round tool steel of your choice, 4 1/2" to 6" long.
The Center Punch.
1. You need to make only one center punch. It will work for all three sizes shown in Figure 2.
2. Using one piece of stock, forge and/or grind a really sharp center punch. It is to have about a 30 degree included angle that can be driven into the hot
steel for a maximum depth of 1/16". This punch is used to make the pupil.
The Pupil Punch.
1. The pupil punch looks similar to a carpenter's nail set. If you don't know what one looks like, it is the tool in the center of Figure 1.
2. Using another piece of stock, forge and/or grind a short taper (less than 1/4" long) and file the end flat, so the diameter at the end is slightly
larger than the size of the eventual animal eyeball that the eye punch will form. (You will need this extra material in Step 4.)
3. Bring the tapered end to an orange heat and clamp it vertically in a good vise. Using the center punch, center it carefully and make a shallow
(1/32" to 3/64") indentation in the end. Reheat and straighten the punch if necessary. It's okay if the center punch mark is slightly off of
center; that will be corrected in the next step. Reheat again and drive the center punch deeper, until it is a maximum of 1/16" deep. Reheat
and straighten as needed.
4. Carefully grind away material at the tip so that the punch mark is centered. Leave about 1/32" material around the center punch mark.
(The material you leave is the size of the eyeball you will end up with).
5. Finish the punch by rounding the edge and smoothing with a light file or sandpaper. See the middle tool in Figure 1 to get the shape.
6. Harden as appropriate for the steel you are using and temper to the equivalent of a straw color in plain carbon steel (pretty hard, but not
too brittle).. The hardening process you use will depend upon the kind of tool steel you are using.
The Eye Punch.
1. Using a third piece of stock, grind a taper on one end that is slightly larger in diameter than the finished eye punch needs to be. You will need
this extra material in Step 5. If you are using 3/8" stock, the taper may be minimal. See Figure 2 to get the idea.
2. File the end flat.
3. Bring the end to an orange heat, carefully center the pupil punch on the heated end and drive it into the end of the hot stock. Be sure
that the punch is well centered! Use only one blow to set the location.
4. If the eye punch has become distorted from Step 3, reheat and carefully straighten it.
5. Repeat Steps 3 and 4, as needed to drive the pupil punch deep enough to form a pointed cone where the pupil is. Try to get the impression
deep enough so the point of the cone is not flat.
6. The end of the eye punch now has a circular, concave depression with a sharp cone in the center.
7. Grind away the excess material around the depression leaving about 1/32" around the rim. Working back from the tip, the taper gradually
becomes the size of the parent stock.
8. Note: It is real easy to grind away too much at this point and ruin the tool -don't try to get too close with the grinder. Do not touch
the tip of the pupil with the grinder or file because this will flatten it. Use a file to finish and gently round the wall.
9. This method obvously produces a punch that makes a round eye. I think I saw Monte carefully turn the punch from making a round eye to making
a slanted eye by gently flattening the end of the punch it while hot with a hammer. If you want to try this, I suggest a little practice first!
10. Harden and temper as you wish, the same way as for the pupil punch. Remember, if you are using re-rod, you will lose some of the hardness
as soon as you drive the punch into hot metal. This might be a real good place to use S1, H13 or Atlantic 33. S7 can't be filed once it has
been heated. Monte uses coil spring stock.