Some Tips on Tapping Holes
Last updated: October 18, 2023
FIRST Tapping Lesson Removing Stuck Fastners Home
Blacksmithing Guild of Metalsmiths Contact Us
This article is for people who have already done some hole tapping and who have had unexpected bad things happen to them during the process. I hope that some of this information will reduce tap breakage and frustration. If you are new to tapping holes, read my Begin-to-Tap article first.
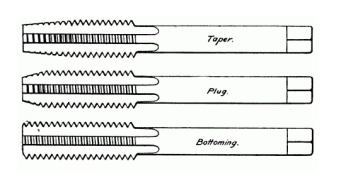
Hand Taps come in 3 different basic styles, Taper, Plug and Bottoming (that is, in the USA). This relates to the number of chamfered threads at
the business end of the tap.
Taper taps have 8 to 10 chamfered threads, Plug taps have 3 to 5 chamfered threads and bottoming taps have only 1 to
1 1/2 chamfered threads.
You should tap through holes with a plug or taper tap. If tapping a blind hole, start with a taper or plug tap, clean
out the hole after going as far as you can then finish with a bottoming tap.
Either taper or plug taps can be had in the "Spiral pointed" version. This spiral relates to the tap's ability to push
the chips ahead of itself. Sometimes they are called "gun taps". This doesn't mean they are for use on guns; just
that they "shoot" the chips ahead. This kind of tap doesn't need to be backed out after cutting a few threads.
There are also many other innovations in tap design.
1. If I were going to risk OVERspending on any tool in my shop, it would be on taps. I would NEVER knowingly have a "carbon
steel" tap in the house. HSS as a minimum, and made in USA, from a well known tool maker.
2. I almost always have at least the plug and bottoming tap of any size I use. The only exception is for the bigger (to me)
sizes, like 5/8,3/4 and 7/8" inch diameter taps.
3. I keep more than one tap of the sizes I use most often. I keep one Brand New tap to use to test to see if my other
taps are getting dull. Just today I had to tap two 1/4-20 holes about 1" deep. I picked out a plug tap and started at it.
The tap worked pretty hard, even though I used my normal sulpherized cutting oil liberally on the hole. I didn't want to
break the tap, so I went for the new one. It tapped the other hole like a dream, without having to stop and back the tap
out at all! What to do? ----Immediately, throw out the old tap!!!!
4. It seems that most hardware stores and even some tool catalogs sell the Plug tap as the "default" tap. It might pay to
get a few taper taps in a few sizes to ease the task and the strain on the tap itself.
5. There are also taps that have short areas of reduced diameter shank. The idea is that if you break the tap, it will break
well above the hole, making it easier to remove.
6. Always take the time to chamfer the hole before starting to tap it. This reduces stress on the lead threads on the tap
and helps keep the tap straight.
7. Nothing is worse for a tapped hole than starting the tap crooked. And often as not, you wobble around for a few turns.
If the hole is started crooked, the hole itself will eventually try to straighten the threads. This causes more friction
and increases the likelihood that the tap will break.
8. As Dave Mariette said in a recent Bellows post, "use the drill press for tapping operations whenever possible". For me,
instead of chucking the tap in the drill press chuck, I do the following: I chuck the tap in a "T" style tap wrench, just
as you would do for hand tapping. Then I put a center drill into the drill chuck. The upper end of my tap wrenches all
have a small hole bored in the end. Next, I stick the tap into the hole to be tapped, then run the drill press spindle
down so the center drill enters the hole in the top of the tap wrench. This holds the tap exactly vertical so I can cut
the first 2 or 3 threads. Then I tap the rest of the hole.
9. If you can't use the drill press, there are several alternatives:
A. I often take a piece of square stock, let's say a 1 inch cube and drill a tap-size hole right through it. Then I set
the block over the hole, stick the tap down through it and I'm off and running.
B. Bob Walsh just told me that he uses the level that is built into his drill.
C. I once saw a little tool that was just a short piece of angle iron with a vertical groove in one side. To use it,
you push it up against the bit for one axis, then sight the vertical groove for the other.
D. I have designed a small drilling jig for holding both the drill bit and the tap vertical to the surface.
Click Here for plans to make my Hole Tapping Jig
10. My next-to-last comment is about drilling the correct size hole for the tap. There are tables you can use for this.
I'm no expert, but I think those tables are usually designed to produce a 75% thread. If you are drilling in real
tough material, and if there won't be a lot of stress, you can sneak the hole open a few extra thousandths.
Did you know that you can calculate the tap drill size without the table? Here's how:
-Subtract 1/Pitch (threads per inch) from the major diameter. That's the tap drill size!
Example: 1/4-20: 1/4" = 0.250. 1/20= 0.050. 0.250-0.050=0.200. You need a drill bit that is about .200" diameter.
(In this case, either a #7 or a 13/64�, which is 0.203� will work fine.)
Another example: 3/8-16: 3/8-1/16= 5/16.
11. Last comment: ALWAYS use plenty of appropriate lubricant. An old engineer that I worked with for many years told me
that "anything, even water, is better than nothing".
-For all carbon steels, I use the sulpherized cutting oil that hardware stores sell for pipe threading.
-For aluminum, kerosene or fuel oil works well. Some people use wd-40.
-You need different lubes for other metals, except for cast iron, which needs none, usually.
A guy recently emailed me to comment on my "no carbon steel taps" statement in my "Tips on Tapping" section, above.
He commented that gunsmiths DO use carbon steel taps because they tend to
break a lot, but are easy to remove by smashing them.
I don't do any gunsmithing- the idea of drilling into someone's gun
barrel scares the dickens out of me. So, I asked the following question on the newsgroup rec.crafts.metalworking:
---"Isn't maybe, the REASON the little taps break often that they ARE carbon
steel?
And, just for information, how DO you tap a 2-56 or 4-40 or whatever hole in
a gun barrel? If you can only go 2 or 3 threads deep, you can't start with
a taper or even a plug tap, can you?
And, finally:
Are gun barrels hardened/hardened and tempered or are they just an annealed,
tough steel like 4140?
1.Most holes for sights are 6-48.
The barrels are usually just tough steel, but the receiver is where you do
most of the drilling and tapping, and they can be all over the place.
You start the tap with a guide so a lot of starting taper isn't needed.
Carbon steel taps are slightly harder than HiSpeed. They are also more
brittle and shorter lived. That's ok, most gunsmiths I know only use them
once.
They also grind the shank on them down to weaken it. That way, if it breaks,
it'll break at the shank and not down in the hole.
The real old timers would reharden them to cut really hard materials.
Also, if it does break off, You can soften a carbon steel tap with a torch.
It is easier to drill that way.
2. The fellow (#1, above) was absolutely correct as well. I've had to EDM out
strong taps..and carbide ones. Not fun..not fun at all.
3. To tap a shallow hole, grind off the point of the tap and start the threads, then put in a bottoming
tap..or grind a bottoming tap from a regular one.
4. I had asked: "Are gun barrels hardened/hardened and tempered or are they just an annealed,
tough steel like 4140?"
Answer: All of the above. ---and, as you will see later, sometimes case hardened.
5. The pros use a bushed fixture for tapping holes
Google: "Bushed Fixture for Tapping Holes"
6. Barrels are EASY to drill. They have to be drilled the long ways,
after all, at least once, plus reaming and rifling. So can't use
really nasty machining steels for that.
The problems are with
drilling and tapping military bolt actions. Post-WWII commercial
actions usually come with holes already in them, just turn out the
plug screws and mount the appropriate base. Military bolt actions in
the really old days were mild carbon steel that was machined and then
pack-hardened. Those are a bear to do, fortunately, the guns are
getting too valuable as collector's items to make into sporters now;
they went for as little as $10-20 back in the '50s and '60s.
You can
sink more than the cost of a new commercial rifle into such a sporter
and reduce the value to half what you spent, now. On those case-
hardened actions, these days you can get carbide drills to make the
holes, old-timers had to use mercury-hardened carbon steel drills and
even then sometimes didn't manage to chew through the skin.
Heavy
black sulfur cutting oil is the best stuff for tapping. Bushing-
guided fixtures are a must for drilling and tapping, just asking for
trouble without them. That's the reason that Forster fixture has been
in production for decades.
Fine-pitch screws are used, usually not in the standard series. 6-48
and 8-40 are common, taps are a little more robust, too. Carbon steel
taps are more than adequate for barrel steels and cleaning out
buggered threads on commercial guns. A small dogbone tap wrench gives
a good feel, you can tell when a tap starts winding up and back off
before it goes. Shallow holes where there's about 5-6 threads, use the
fixture with a 2nd tap to start followed by a plug tap.
7. One guy:
I read somewhere that melting a blob of solder on the receiver would
anneal the case enough for drilling and tapping. I haven't tried it.
Another guy:
No..a dab of melted solder doesn't do a damned thing for anealling a
Springfield receiver for drilling. The closest thing I found..was a
tiny little jewelers torch used properly. And thats a pain in the (backside).
8. Case-hardened scrap hydraulic cylinder rod cuts well enough with
carbide.
9. Case-hardened '03 actions can also be spot-annealed with a cut-off nail in a
drill press. You just use friction to get a small spot very hot.
You can tell by the
serial numbers which ones were made this way.
As an earlier poster says, this is not something one would do today with a
rifle that old.