Making a Paul Revere Pierced Tin Lantern
Last Revised: October 19, 2023
Several years ago, about 1992, my wife and I visited Sturbridge Village, southern Massachusetts. We highly recommend it,
by the way.
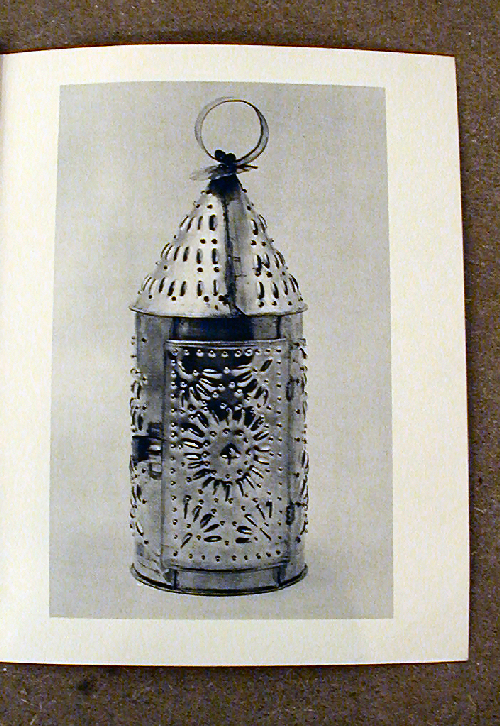
There in the gift shop we saw a "Paul Revere" Pierced tin lantern.
We thought we'd like to buy one, but they were about $80 each at the time.
Instead, we bought a set of full size plans for $10, thinking that we'd make our own when we got home.

When we got home, we put the plans away and let life happen for a year or so. Then one day while discussing the lamp with
Kitty Latane', a well known tinsmith from Pepin, Wisconsin, she offered us the address of her supplier of tin plate.
So, we ordered a package of 25 sheets, 17" x 22".
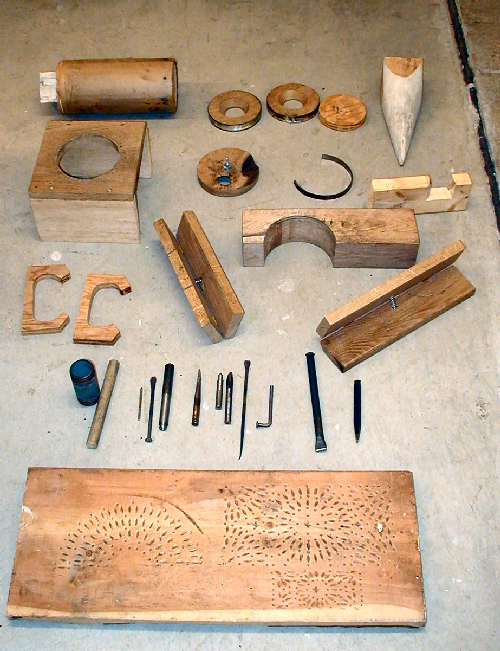
When the tin arrived, we chose an evening and decided to look into the plans and build our own pierced tin lantern. Much to
our surprise, we discovered that it would require 22 fixtures and special tools to do the job.
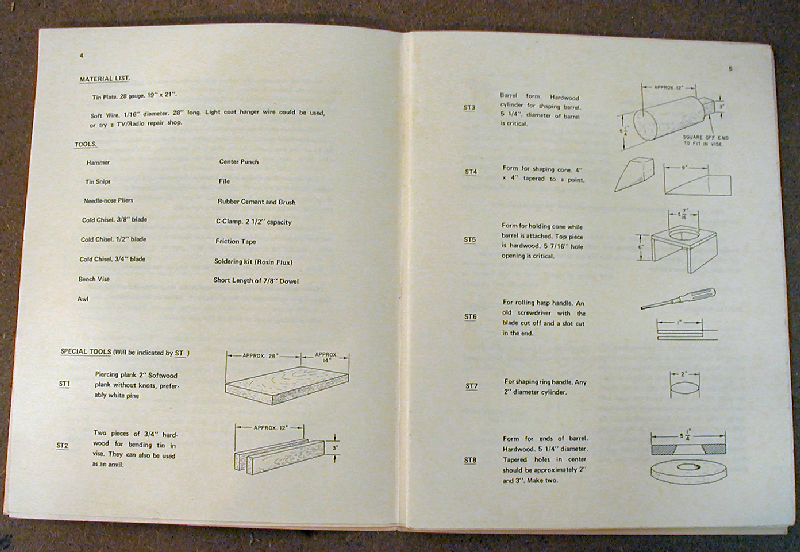
Over the following week, I made all the needed tooling.
It turned out pretty well. We put a candle in it and lit it. Yes, it worked! However, we soon found that the candle got so
hot inside the lantern that it melted the edge of the candle that usually retains the molten wax that feeds the wick.
This meant that the wax, as it was melted by the flame, ran down the side of the candle and onto the bottom of the lantern
where it couldn't feed the wick.
We figure that a 6" candle is about a 6 hour candle. In this lantern, the candle was gone in about 1 1/2 hours. That's no
good, is it?
So, I decided to build another lantern, only this time, we punched six half inch diameter holes into the cone-shaped top to
let the excess heat out.
We were pretty confident that would solve the problem. But that change didn't make any difference at all! The candle was
gone in 1 1/2 hours!
Okay, by now, solving the problem is beginning to take on the character of an obsession. Let's build another one (since we
already have enough tin for a couple dozen lanterns, and since we already made all the tooling).
This time, however, we won't even put a top on it at all.
Guess what? Again, no change!!!!
Looking down into the open-top lantern, we could finally see what the real problem was. The candle is centered in a
cylindrical tube. Almost all the heat and light that is emitted from the flame is reflected right back to the candle
itself, focusing the heat in the worst possible place.
What to do? We contacted the research department at Sturbridge Village and explained our problem. They politely told
us that they hold workshops where visitors come and make their own lanterns, and that they always end up with the same
problem!
Then they went on to explain that these pierced tin "lanterns" we not really lanterns at all! They were used as
candle CARRIERS in the days before matches were commonly available. The idea was that, when you needed to go from the
house to the barn or to the privy, you'd take an already lit candle from its current receptacle and place it into the
candle CARRIER for the trip from one building to another. The candle carrier is designed to keep the candle lit in even
a strong wind. This is a big advantage before street lights, matches and electric flashlights.
Once you arrived at your destination, let's say to milk the cow, you'd take the candle out of the candle carrier and
place it out in the open where it could shed as much light as possible.
Well, so much for that! We still wanted our "Paul Revere Pierced Tin Lantern" to behave as a lantern, not just as a
transient candle CARRYING device.
Suddenly, my wife Sheri came up with an idea: Why not paint the inside of the lantern flat black? This might soak up the
heat and would certainly minimize the amount of heat and light that would be re-radiated back to the candle.
I wasn't too confident about the idea, but I went along with it.
We bought a small can of flat black 1000 degree stove paint for the job.
We applied the paint to the inside of the sidewalls and to the inside of the top.

After allowing the paint to dry thoroughly, we lit up a new candle and WOW!, the candle life immediately went from 1 1/2 hours to 4 1/2 hours. A great success.
Now that we'd made 3 lanterns (I finished the one without the top), we decided to take best advantage of all the tooling
and all the tin that we had bought.
We made 15 more of them.
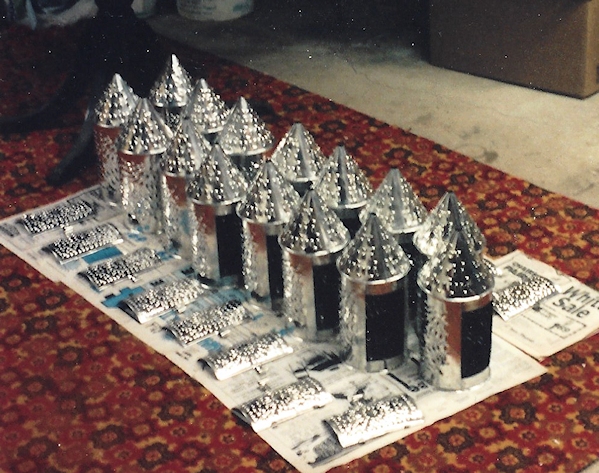
Here are 15 of the 16 tin lanterns almost completed
Then in 1993, we decided to give most of them away as gifts.
We still have a couple of them around the house and we take them to historical reenactments where we demonstrate our
crafts.
It sure was an interesting project. As I update this in late 2014, Sturbridge Village still has those lanterns
for sale in their Gift Shop and they still offer workshops for making your own "Paul Revere Pierced Tin Lantern"/Candle
Carrier.
They also still sell the "How to Make a Pierced Tin Lantern" booklet. As of December, 2014, the cost is $16.95. Although Sturbridge Village has
an online store, the book is only available in their on-site Gift Shop. You can call them during regular business hours at: 1-508-347-0244 and they will
ship one to you.